
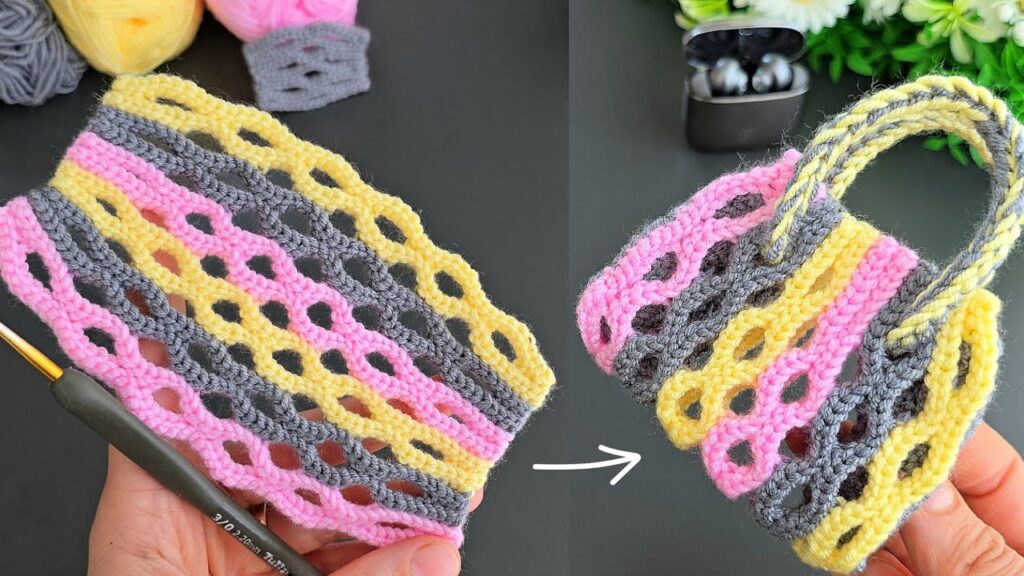
That’s a crochet mini bag made using an open lace and solid stripe pattern in three colors (grey, pink, yellow).
Here’s how you can make it step-by-step 👇
🧶 MATERIALS
- Yarn: 3 colors (Color A – Gray, Color B – Pink, Color C – Yellow)
→ DK (Light #3) or Sport Weight yarn - Hook: 2.0 mm – 2.5 mm
- Scissors, yarn needle, stitch markers (optional)
💫 STITCHES USED
- ch – chain
- sc – single crochet
- dc – double crochet
- sl st – slip stitch
- sk – skip stitch
- rep – repeat
🧵 STEP-BY-STEP PATTERN
🩶 Step 1: Foundation Chain
- Using Color A (Gray),
chain 40 + 3 = 43 chains (the +3 is the turning chain, counts as 1 dc).
You can adjust the size — the pattern repeat is 8 + 3 chains.
💛 Step 2: Base Row (solid row)
- 1 dc into 4th chain from hook.
- 1 dc in each chain across. (You should have 41 dc total.)
- Turn your work.
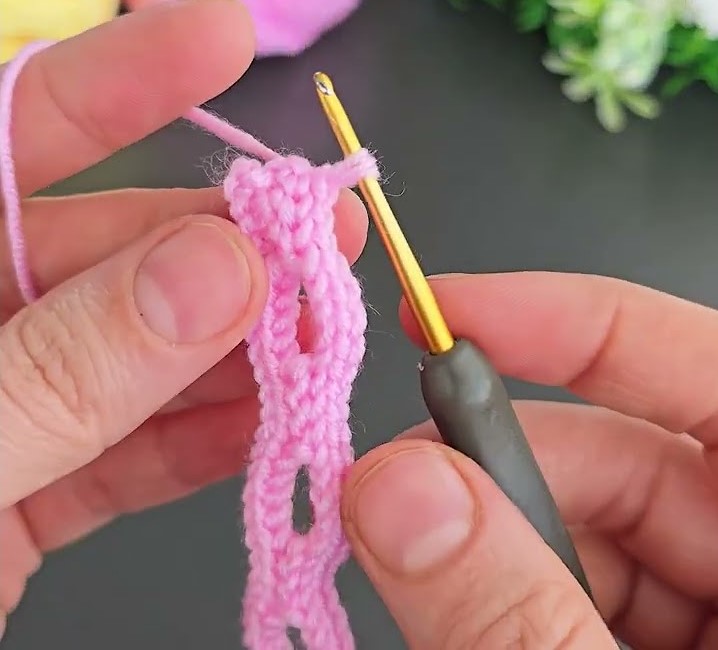
💗 Step 3: Mesh (hole) row
- Switch to Color B (Pink).
- Ch 1 (does not count as st). sc in first dc.
- Ch 5, skip 5 dc, sc in next dc.
- Repeat ch 5, sk 5, sc in next across the row.
- You’ll end with a sc in the last stitch.
- Turn.
🪡 Tip: Each ch-5 creates the long “hole” in the mesh.
💛 Step 4: Fill the Mesh
- Ch 3 (counts as dc).
- Make 4 dc in the first ch-5 space,
- sc in next sc (between holes).
- 5 dc in next ch-5 space, sc in next sc.
- Repeat across.
- Turn.
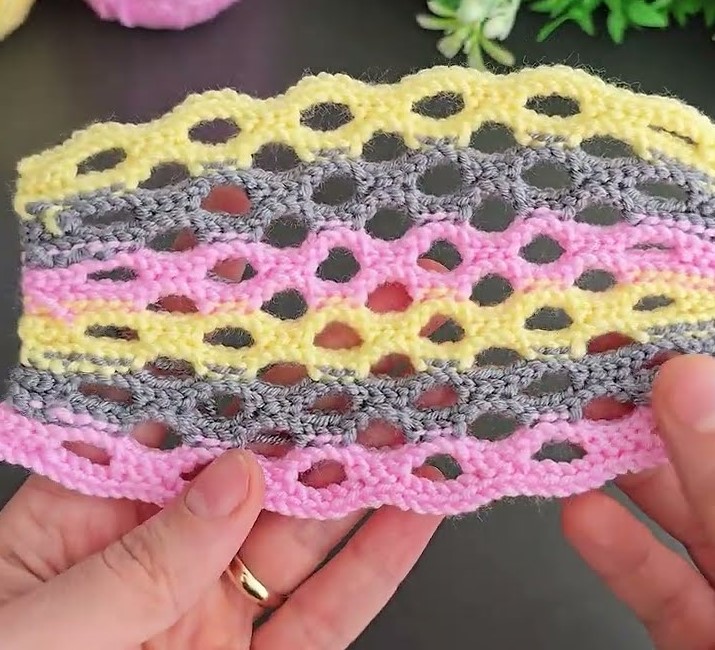
You now see 3D stripes forming — lace + solid stitches.
🩶 Step 5: Solid Stripe Row
- Change to Color A (Gray) again.
- Ch 3 (counts as dc),
- 1 dc into every stitch across the row.
- Turn.
✨ Step 6: Continue Pattern Repeats
Repeat Rows 3–5, changing colors each time:
| Section | Row Type | Color |
|---|---|---|
| 1 | Mesh | Pink |
| 2 | Fill | Pink |
| 3 | Solid | Gray |
| 4 | Mesh | Yellow |
| 5 | Fill | Yellow |
| 6 | Solid | Gray |
| 7 | Mesh | Pink |
| 8 | Fill | Pink |
| 9 | Solid | Gray |
Continue this pattern until your piece measures about 18–20 cm long.
👜 Step 7: Forming the Bag
- Fold the piece in half (right sides facing out).
- Align the sides carefully.
- Use slip stitch or single crochet to join the side seams.
- Join along both left and right sides.
- Turn right side out.
You’ll now have an open pouch shape.
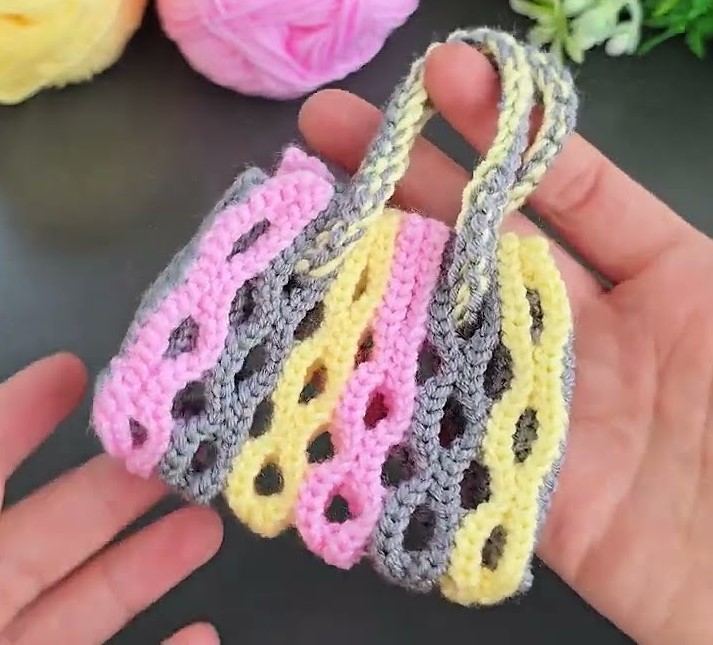
🪝 Step 8: Making the Handles
You can crochet the handles directly on top.
Option A — Simple Braided Handles
- Take two strands of yarn (e.g., Gray + Yellow).
- Chain about 45–50 chains (for one handle).
- Slip stitch back along the chain to make it thicker.
- Sew or attach each end to the inside top corners of the bag.
Option B — Crochet Cord Handles
- Chain 45.
- Work 1 sc in each ch back across.
- Fasten off and sew securely to each side.
🧶 Optional Finishing
- Weave in all yarn ends neatly.
- You can add a lining (fabric inside) for extra strength.
- Add a button or snap closure at the top if you want.
🌈 Pattern Summary (for reference)
| Row | Stitch Type | Description |
|---|---|---|
| 1 | dc | Base row |
| 2 | sc + ch 5 loops | Mesh row |
| 3 | 5 dc clusters | Fill mesh |
| 4 | dc | Solid row |
| Repeat | — | Alternate colors and repeat rows 2–4 |