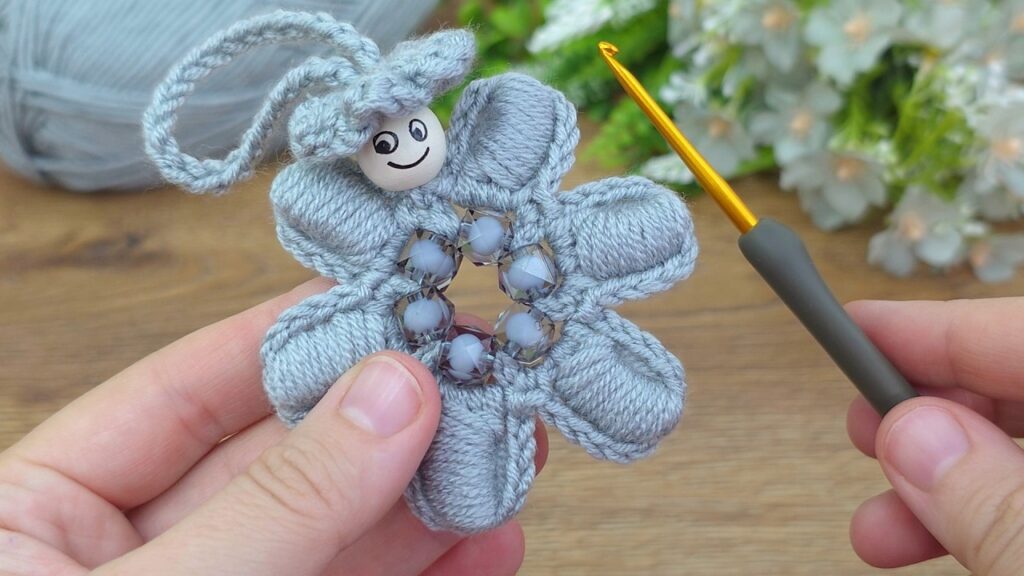
That’s a super cute crochet project! 😊 The image shows a crochet flower ornament with petals, beads in the center, and a wooden bead face on top — likely used as a Christmas or decorative hanging ornament. Here’s a full tutorial on how to make it:
🌸 Crochet Beaded Flower Ornament Tutorial (with Face)
🧶 Materials:
- Yarn: soft acrylic or cotton (light gray in the photo, DK or worsted weight)
- Crochet hook: 3.0–3.5 mm
- 5 small beads (for center)
- 1 wooden bead (for head, about 1.5–2 cm wide)
- Yarn needle
- Stitch marker (optional)
- Fabric glue (optional, for attaching head securely)
- Black marker or embroidery thread for the face
🪡 Step 1. Prepare the Beads
Thread 5 small beads onto your yarn before you start crocheting.
Tip: Wrap the yarn end with tape to make threading easier.
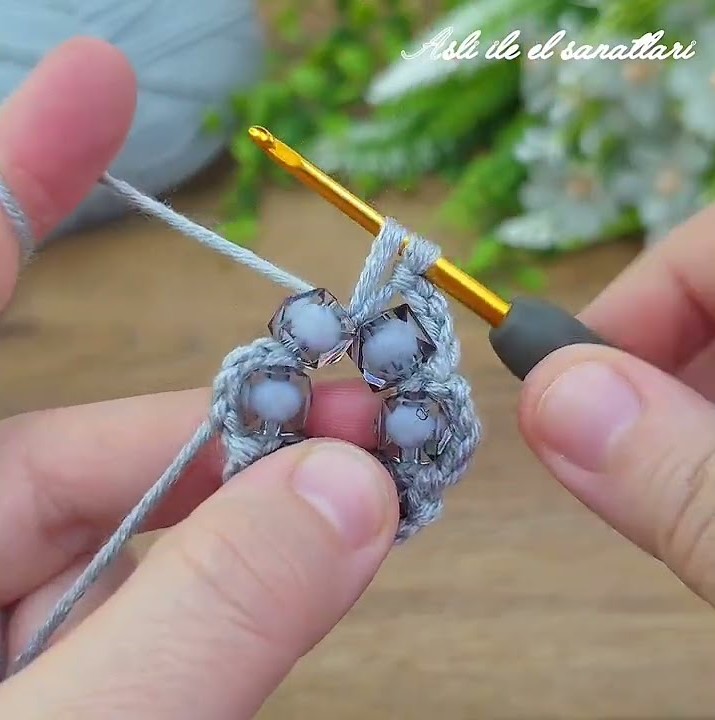
🌼 Step 2. Crochet the Beaded Center
This forms the base of your flower.
- Make a slip knot on your hook.
- Chain 5, then join with a slip stitch into the first chain to form a ring.
- Chain 1, slide 1 bead close to your hook, and make 1 single crochet (sc) into the ring while securing the bead in front.
- Repeat this: slide another bead → make 1 sc into ring → repeat until you have 5 sc with beads around.
- Join to first sc with slip stitch.
Now you have a small ring with 5 beads forming the flower’s center.
🌸 Step 3. Create the Flower Petals
We’ll make thick petals using puff stitches or clusters.
- Chain 3 (counts as 1 dc).
- In the same stitch:
- Yarn over, insert hook, pull up a loop (3 loops on hook),
- Yarn over, insert hook again, pull up a loop (5 loops),
- Repeat until you have 9 loops total,
- Yarn over and pull through all loops on hook,
- Chain 2 to close the puff.
- Skip next stitch, and in the next stitch make another puff cluster like above.
- Repeat around until you have 5 puffy petals (one between each bead).
- Slip stitch to the base of the first puff to join.
You’ll see a flower with 5 thick petals around the bead center.
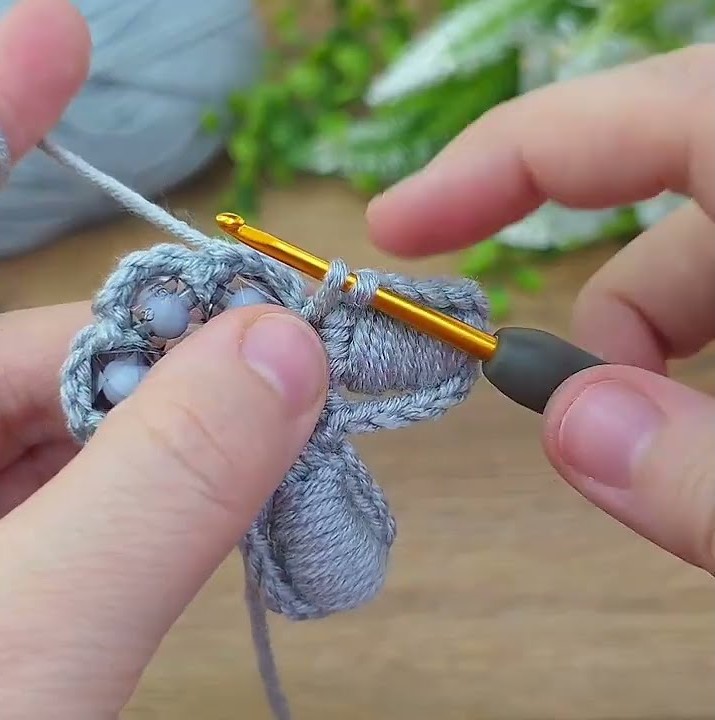
💠 Step 4. Outline and Shape the Petals
To give definition and the neat edges like in the photo:
- Attach yarn to the back loop of any puff.
- Chain 1 and work single crochet stitches evenly around each petal edge (about 5–6 per petal).
- Slip stitch between petals to shape them clearly.
- Continue until you complete all 5 petals.
- Fasten off and weave in the end.
Now your flower looks firm and dimensional.
🧵 Step 5. Make the Head
- Take the yarn tail left at the top center (or attach new yarn).
- String it through the wooden bead (for the head).
- Pull the yarn through until the head sits snugly on top of the flower.
- Secure it underneath with a tight knot and a dab of glue if you want extra hold.
Optional: Draw a smiling face using a fine marker or embroider it with black thread.

👒 Step 6. Crochet the Hat (Cap)
To make the little frilly hat seen on the head:
- Attach yarn on top of the wooden bead.
- Chain 4 and join to form a ring.
- Work 8 single crochet into the ring, join with slip stitch.
- Next round: 2 single crochet in each stitch (16 total).
- For a ruffled edge: (1 sc, 1 dc, 1 sc) in next stitch repeat around.
- Slip stitch to join and fasten off.
This makes a cute wavy edge hat.
🪢 Step 7. Add Hanging Loop
- Attach yarn at the top of the hat.
- Chain 20 (or your desired loop length).
- Join to the start point with slip stitch to form a loop.
- Fasten off and weave in ends neatly.
✨ Step 8. Final Touches
- Adjust the petals with your fingers to shape them evenly.
- Optionally, lightly steam-block the flower for a perfect finish.
- Draw or embroider the smiley face neatly.
- If you want extra sparkle, you can add a few seed beads to the petal tips.
🎀 Result
You’ll get a cute flower ornament with:
- Puffy petals
- Bead-decorated center
- Wooden bead face
- Crochet hat and loop for hanging
It’s perfect for Christmas trees, gifts, or car charms.