Here is a step-by-step tutorial for making the square motif shown in your picture.
This motif is made from one small center square and four triangle corners added around it.
🧶 FULL DETAILED TUTORIAL — Crochet Diamond Square Motif
The motif is made from:
- One small center square
- Four triangle panels (each worked on one side of the square)

🟩 PART 1 — CENTER SQUARE (Cream)
This center square is very small—only one round.
Round 1
- Make a magic ring
- Ch 3 (counts as 1 dc)
- Into ring:
- 2 dc, ch 2
- (3 dc, ch 2) repeat 3 more times
- Pull the ring tight.
- Sl st into top of beginning ch-3.
- Fasten off.
You now have a tiny 4-corner square with:
- 4 groups of 3 dc
- 4 ch-2 corners
This is your foundation.

🟪🟧🟫🟦 PART 2 — TRIANGLES ON EACH SIDE
Each triangle is worked on one side of the center square.
You should not work into the corners, only the straight edges.
Each triangle has 3 rows, all made with double crochet.
🔸 How to Attach a Triangle (General Method)
Row 1
- Attach yarn in the right corner ch-2 space of the side.
- Ch 3 (counts as dc)
- Work 8 dc evenly across the stitches of that side.
- (The center square edge has exactly 9 dc spots: ch-3+2dc)
- You will have a total of 9 dc for this row.
Turn.
Row 2
- Ch 3
- Dc into each stitch across
→ Still 9 dc
Turn.
Row 3
- Ch 3
- Dc into each stitch across
→ 9 dc
Fasten off.
✨ This makes a perfect rectangle-shaped triangle panel like in your photo.

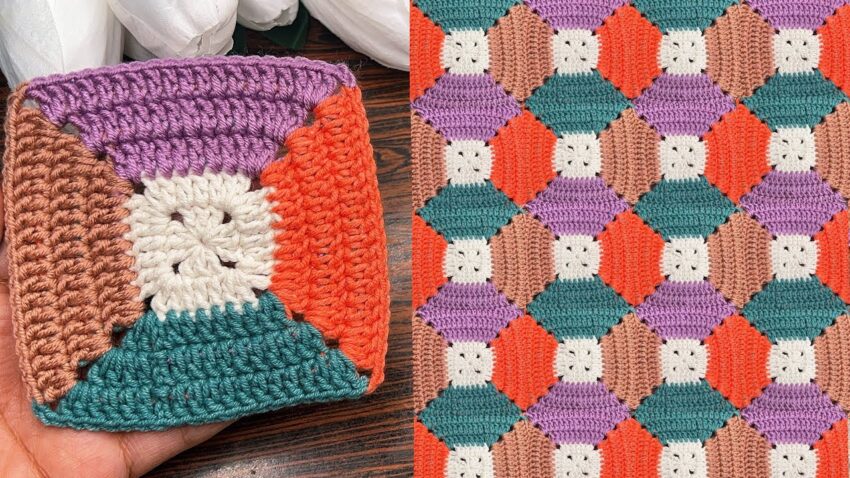
🎨 COLOR PLACEMENT (as in your image)
Repeat the triangle method on each of the 4 sides of the center square:
- Top triangle: Purple
- Right triangle: Orange
- Bottom triangle: Teal green
- Left triangle: Brown
After all four triangles are attached, your piece looks exactly like the left image.
🧵 DETAILS ABOUT THE SHAPE
Each triangle is not decreasing—it stays the same width.
That’s why it forms a trapezoid panel, which gives that special diamond look when joined with other motifs.
🧷 PART 3 — JOINING MOTIFS TO MAKE THE BIG PATTERN
The motifs are joined side to side, touching the triangles.
Recommended joining method:
➡️ Slip stitch join
or
➡️ Whip stitch (sewing) through back loops only
How to join:
- Place two motifs right sides together.
- Align triangle edges.
- Slip stitch through back loop of motif A + back loop of motif B.
- Do not stretch—keep joining evenly.
This produces the diamond pattern exactly like your right image.

📏 SIZE NOTES
- Center square = small
- Each triangle = 3 rows
- Final motif = approx 10–12 cm depending on yarn