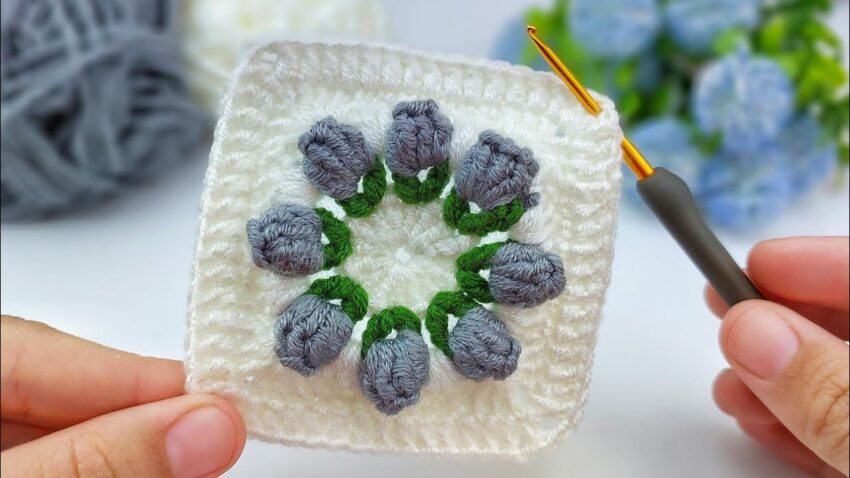
Sure! Here is a step-by-step tutorial for the exact tulip granny square in your image.
I’ll break it into rounds, and explain stitch counts, placement, tips, and common mistakes so you can follow easily.
🌷 3D Tulip Granny Square – SUPER DETAILED TUTORIAL
🔹 YARN & HOOK
- White (background)
- Green (leaves/stems)
- Gray (tulip buds)
- 3.0–4.0 mm hook
- Scissors & needle

⭐ ROUND 1 — CENTER BASE (White)
1️⃣ Make the center circle
- Make magic ring
- Ch 3 (counts as DC)
- Work 11 DC into ring → total 12 DC
- Pull ring tight
- SL ST to top of ch 3
✔ You now have a flat round white circle.
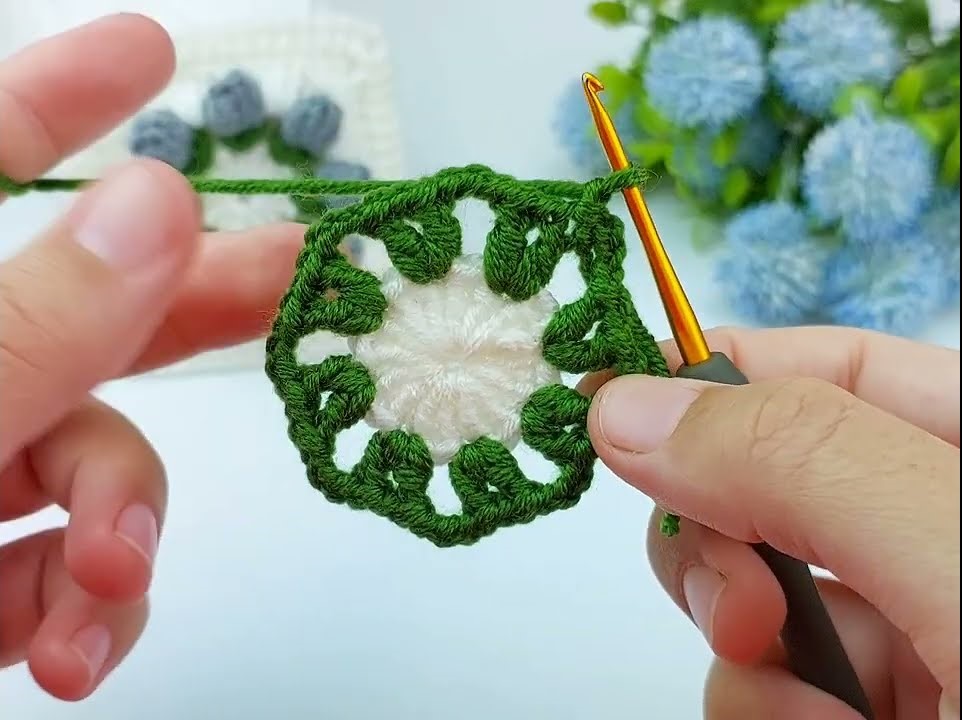
⭐ ROUND 2 — LEAF BASES (Green)
You will create 8 leaf/stem bases evenly around.
2️⃣ Start green
Attach green yarn in any stitch.
3️⃣ Pattern around
In each of 8 evenly spaced points, do:
(SC, Ch 3, SC) in the same stitch
To space them correctly:
- Skip 1 stitch between leaf groups
- Work the next leaf base into the next stitch
So the sequence is:
In next stitch: SC – Ch3 – SC
Skip 1 stitch
Repeat 8 times
At the end you should have:
✔ 8 leaf loops (each ch-3 loop is where tulips will be worked)
✔ Even spacing around circle
SL ST to finish.
⭐ ROUND 3 — 3D TULIP BUDS (Gray)
Each tulip is formed by two puff stitches worked inside one green ch-3 loop.
4️⃣ Attach gray yarn
Insert hook into the first green ch-3 loop.
Pull up gray yarn and Ch 1 to secure.
5️⃣ Tulip puff (very detailed)
To make one puff:
- Yarn over
- Insert into green loop
- Pull up a long loop (≈ 1 cm)
- Repeat the above 4 times → you have 9 loops on hook
- Yarn over, pull through all loops
- Ch 1 to close puff
This forms a rounded tulip petal shape.
6️⃣ Make TWO puffs per tulip
In each green loop:
- Puff #1
- Puff #2
- Ch 1 (optional, helps shape)
So repeat for all 8 loops:
(Puff, Puff) in same green loop
Join with SL ST.
✔ You now have 8 tulips forming a ring.

⭐ ROUND 4 — TURN THE FLOWER INTO A SQUARE (White)
This round is worked behind the gray tulips.
7️⃣ Attach white yarn
Insert hook between two tulips (the space where the green leaf is).
Pull up white yarn, Ch 2 or Ch 3 depending on height.
This space is called a valley.
8️⃣ Create the base row
Around the flower:
- In each valley: 2 DC (this hides behind the tulip)
- At 4 corner points: (2 DC, Ch 2, 2 DC)
Spacing for corners:
- Make corners at every second valley
- You should naturally see 4 corner positions as the square forms
Make sure stitches stay behind the tulips so the buds stand upright.
Join with SL ST.
✔ Now it looks like a square with tulips in the center.

⭐ ROUND 5 — BORDER FRAME (White)
This round makes the clean, visible square border.
9️⃣ Simple border
Work around:
- DC in each stitch across the sides
- Corners: (2 DC, Ch 2, 2 DC)
Repeat for all 4 sides.
SL ST to finish, cut yarn, weave ends.
🏁 DONE!
You now have the exact tulip square:
✔ 8 tulip buds
✔ Green leaves at the base
✔ Clean white square border
✔ 3D effect