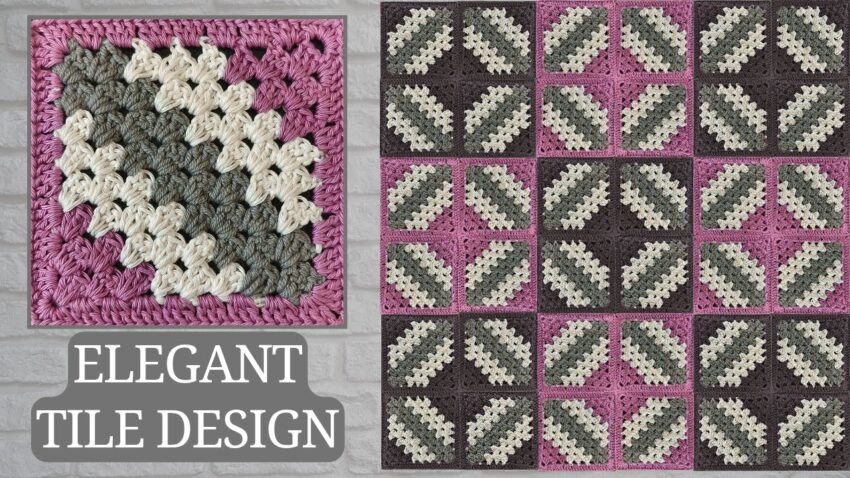
Here is a step-by-step tutorial to make the Elegant Diagonal Tile Granny Square shown in the image.
This motif is built using cluster/granny groups, arranged diagonally in three colors, then framed with a border color.
⭐ STITCHES USED (US TERMS)
- sl st – slip stitch
- ch – chain
- dc – double crochet
- 3-dc group – 3 dc in same space
- corner group – (3 dc, ch 2, 3 dc)
You ALWAYS work in spaces, not stitches — like a granny square.

🎨 COLOR PLAN
- Color A – Cream
- Color B – Grey
- Color C – White
- Color D – Pink border
You can use any colors.
⭐ STRUCTURE OF THE SQUARE
✔ Center starts as a mini diagonal square
✔ You crochet 6 diagonal rows (2 in each color)
✔ Then you add 1 full granny border round
Total = 7 rounds
🧶 ROUND-BY-ROUND INSTRUCTIONS
🔶 Round 1 — Start Center (Color A)
- Ch 4, sl st to form ring.
- Into the ring:
- (3 dc, ch 2) four times
- Sl st to top of first dc.
You have a tiny 4-corner shape (like a mini granny square).

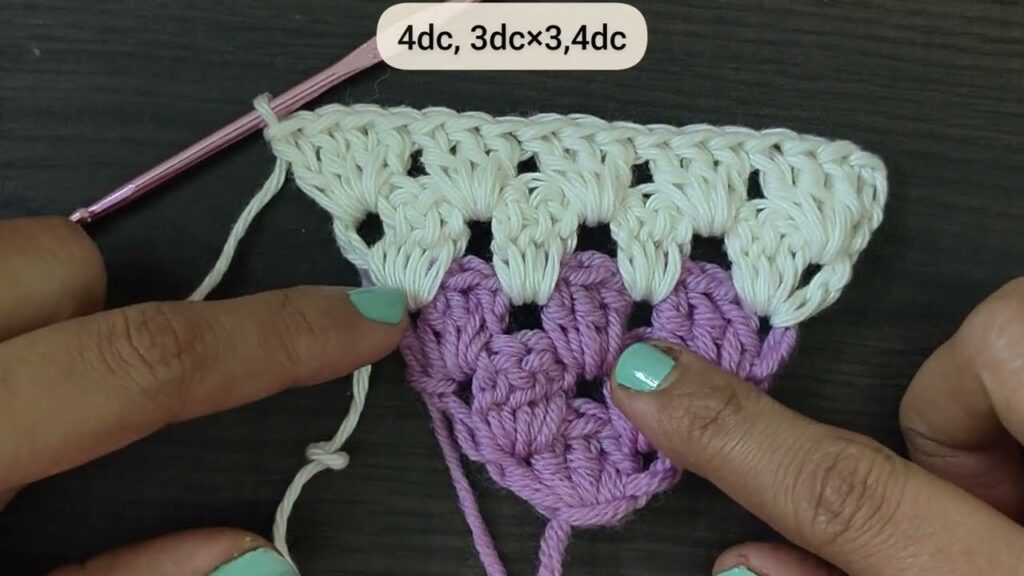
🔶 Round 2 — Begin Diagonal Stripe (Color A)
In this round, you expand only two adjacent sides so the square shifts diagonally.
- Sl st into the next ch-2 corner.
- Work a full corner group:
(3 dc, ch 2, 3 dc) - Next, in the next ch-2 corner, work another corner group.
- On the remaining two corners, work only:
3 dc, ch 2
➡ After this round, the shape will no longer be a perfect square — this is correct. It leans diagonally.
🔶 Round 3 — Switch to Color B (Start 2nd Color Band)
We will now “grow” the diagonal look.
- Join Color B into the first corner where increases continue.
- Work a corner group in this first corner:
(3 dc, ch 2, 3 dc) - In the next side space, work 3 dc
- Work a corner group again in the next corner
- Continue around:
- In each side space → 3 dc
- In each corner → (3 dc, ch 2, 3 dc)
➡ Your diagonal stripe is starting to form.
🔶 Round 4 — Color B (2nd stripe row)
This round builds the diagonal effect clearly.
- In every side space → 3 dc
- In every corner → (3 dc, ch 2, 3 dc)
You should now see:
✔ 2 rows of Color A
✔ 2 rows of Color B
forming a diagonal block.
🔶 Round 5 — Switch to Color C (Start 3rd Color Band)
Same pattern as before.
- In corners → corner group
- In side spaces → 3 dc
This continues the diagonal step.

🔶 Round 6 — Color C (2nd row of 3rd color)
Repeat the same structure:
- Side spaces → 3 dc
- Corners → corner groups
This finishes the diagonal section.
Your motif now looks exactly like the center of the tile in the picture.
🔶 Round 7 — BORDER ROUND (Color D)
This is the pink frame in the image.
Now the square is no longer diagonal — we square it up.
- In each corner:
(3 dc, ch 2, 3 dc) - In each side space:
3 dc - At the diagonal edges (where colors change), place 3-dc groups evenly.
Work all the way around, join with sl st.
✔ Your tile is complete!
✔ Measures around 10–12 cm depending on yarn/hook.
⭐ HOW TO JOIN MULTIPLE TILES
You can join them:
✔ Slip-stitch join (flat & clean)
or
✔ Join-as-you-go granny method
or
✔ Needle whipstitch
Rotate some tiles 90° as shown in the layout to create the beautiful repeating mosaic.