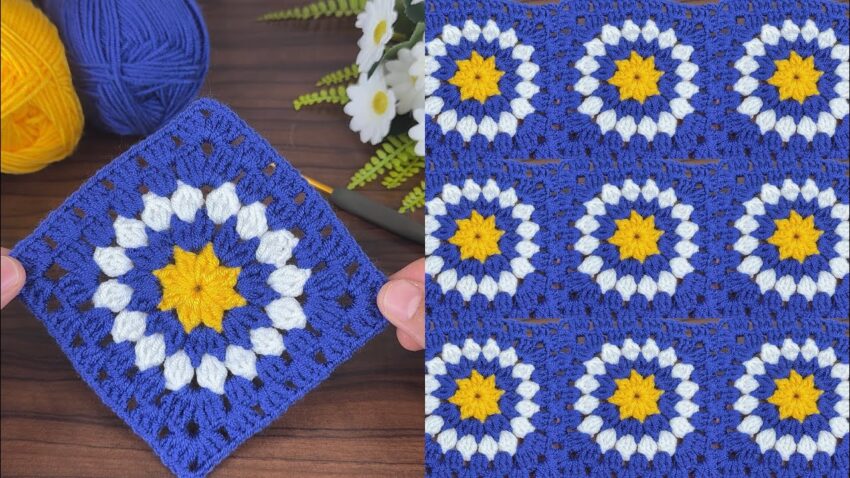
That’s a crochet granny square motif featuring a yellow star center, a white puff round, and a blue border — a lovely daisy or starburst design. 🌼
Here’s a detailed step-by-step tutorial to make it:
🧶 MATERIALS
- Yarn: 3 colors (medium-weight / DK)
- Yellow: for center
- White: for petal ring
- Blue: for outer rounds
- Hook: 3.5 mm – 4 mm (depending on yarn)
- Scissors
- Tapestry needle (for weaving in ends)

🪡 ABBREVIATIONS (US TERMS)
| Abbrev | Meaning |
|---|---|
| ch | chain |
| sl st | slip stitch |
| sc | single crochet |
| dc | double crochet |
| tr | treble crochet |
| st | stitch |
| sp | space |
| yo | yarn over |
| puff st | puff stitch = (yo, insert hook, pull up loop) × 3, yo, pull through all 7 loops, ch 1 to close |
🌼 STEP-BY-STEP PATTERN
ROUND 1 — Yellow Star Center
- Make a magic ring (or ch 4 and sl st to first ch to form a ring).
- Ch 2 (counts as first dc).
- Work 11 dc into the ring.
→ You should have 12 dc total including the starting ch 2. - Pull the ring tight.
- Join with sl st to top of the first ch 2.
- Fasten off the yellow yarn and weave or tuck the end inside the stitches.
✅ Tip: Keep the stitches even; this round forms the small yellow star.

ROUND 2 — White Puff Petals
- Attach white yarn in any dc stitch.
- Ch 1 (does not count as a st).
- In the same stitch, make 1 puff st, ch 1.
- (puff st, ch 1) in each dc around.
→ You’ll have 12 puff sts and 12 ch-1 spaces. - Join with sl st to top of the first puff st.
- Fasten off white yarn.
✅ Tip: Don’t pull the puffs too tight — you want them soft and rounded like flower petals.
ROUND 3 — Blue Round (Filler)
- Attach blue yarn into any ch-1 space between white puffs.
- Ch 3 (counts as dc), then 2 dc in the same space.
- Ch 1, 3 dc in next ch-1 space — repeat around the circle.
→ 12 clusters of 3 dc, each separated by ch 1. - Join with sl st to top of starting ch 3.
- Do not fasten off; continue to next round.
✅ Tip: This creates the round shape and builds space for turning it into a square.

ROUND 4 — Blue (Square Shaping Round)
- Sl st into next 2 dc and into the next ch-1 space.
- Corner: In this ch-1 space, work (3 dc, ch 2, 3 dc).
- Ch 1, 3 dc in next ch-1 space, ch 1.
- Repeat step 2 (corner) and step 3 (side) all around:
- Every 3rd space forms a corner with (3 dc, ch 2, 3 dc).
- All other spaces are sides with (3 dc, ch 1).
- After the fourth corner, ch 1 and join with sl st to the top of the first dc.
- Fasten off and weave in all ends neatly.
✅ Tip: You should now have a perfect square shape.
BLOCKING (Optional but Recommended)
To make each square even:
- Pin the square on a foam board (or towel) to desired size.
- Steam lightly with an iron (don’t press down) or spritz with water.
- Let it dry flat.

JOINING MULTIPLE SQUARES
Use any joining method you like:
- Slip stitch join (through back loops for flat seams),
- Whip stitch with needle,
- Or Join-as-you-go (attach during last round).
🎨 COLOR IDEAS
- Swap yellow for light pink or orange for different flower looks.
- Alternate blue backgrounds (navy, turquoise, lavender).