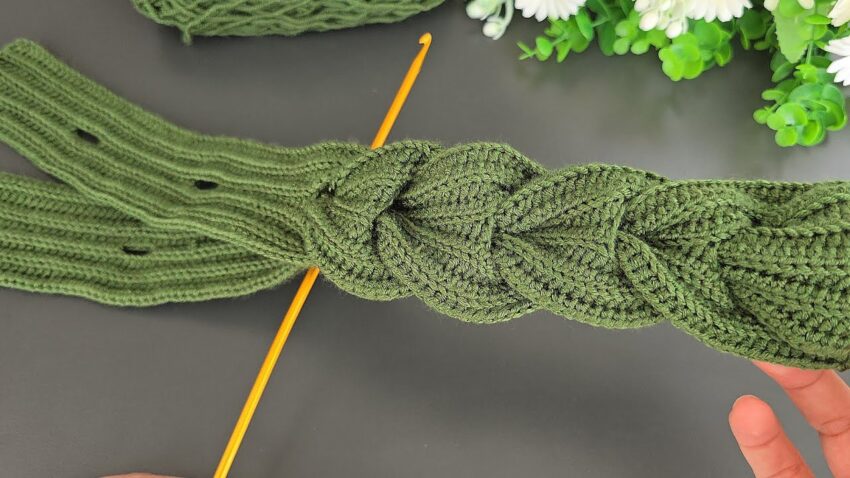
crochet braid (or braided stitch band).The project in your photo isn’t just three separate strips sewn together — it’s actually one long piece with cut-out slits that later get braided. That’s why you see those little “holes” along the length. Let’s do it step by step:
🧶 Detailed Crochet Braid Tutorial

Materials:
- Yarn: Medium weight (cotton or acrylic works well)
- Hook: Size 3.5–4.5 mm (match your yarn)
- Scissors, yarn needle
Step 1: Make the Foundation
- Chain a multiple of stitches depending on the length you want. (Example: chain 120 for a headband size.)
- Work single crochet (SC) or half double crochet (HDC) in back loop only (BLO) for about 6–8 rows.
- This gives the ribbed effect.
Step 2: Create the Slit Rows
- When you reach the row where you want the braid openings, do:
- Chain 8–12 (depending on how wide you want the braid opening),
- Skip 8–12 stitches on the base row,
- Continue with SC or HDC across.
- Repeat this slit pattern evenly spaced across the width.
- Usually 3 slits side by side give you 4 strips that can be braided.

Step 3: Continue Ribbing
- After the slit row, keep crocheting in ribbing (SC or HDC BLO) for several more rows.
- You’ll now have long “strips” created by the slits.

Step 4: Start Braiding
- Take the free strips and separate them.
- Braid like hair:
- Move right strip over middle strip.
- Then left strip over middle strip.
- Keep repeating until the whole piece is braided.
Step 5: Secure the Braid
- When the braid is finished, crochet or sew the ends together.
- Make sure the strips don’t unravel by locking them with a row of SC across the end.

Step 6: Finish Off
- Weave in yarn ends with a tapestry needle.
- Now you can use it as a headband, scarf detail, bag handle, or belt.
✨ Tip: The number of chains you skip for the slits determines how wide each braid section will look. Wider chains = fatter braid loops.