
Great 😊 I’ll explain everything in step by step
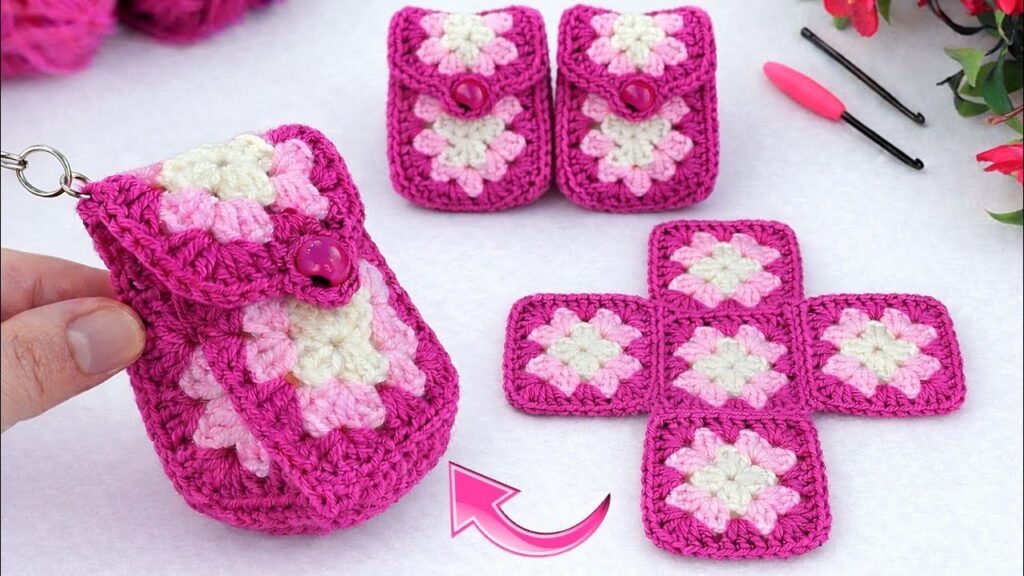
This is a 6-square granny mini pouch with flap and button.
You will:
- Make 6 small granny squares
- Join 5 into a box
- Add 1 as a flap
- Add button + loop
🧶 MATERIALS
- Worsted or DK cotton yarn (3 colors)
- 3–4 mm hook
- Yarn needle
- Scissors
- Button (1–1.5 cm)
- Keyring (optional)
📏 SIZE
Each square ≈ 6–8 cm.
Finished pouch ≈ 8 cm wide × 9 cm tall.
🪡 PART 1: MAKE 6 GRANNY SQUARES
We’ll make a classic 3-round granny square.
🔹 ROUND 1 (Center Color)
- Make a magic ring.
- Chain 3 (counts as 1 double crochet).
- Make 2 double crochet into the ring.
→ You now have 3 dc total (first cluster). - Chain 2.
- Make 3 dc into the ring.
- Chain 2.
- Make 3 dc into the ring.
- Chain 2.
- Make 3 dc into the ring.
- Chain 2.
- Slip stitch to top of beginning ch-3.
- Pull ring tight.
You now have:
- 4 clusters
- 4 ch-2 corner spaces
Fasten off if changing color.
🔹 ROUND 2 (Second Color)
Join yarn in any corner space.
- Chain 3 (counts as dc).
- Make 2 dc in same corner.
- Chain 2.
- Make 3 dc in same corner.
→ Corner made. - Go to next corner:
(3 dc, ch 2, 3 dc) - Repeat in all 4 corners.
- Slip stitch to join.
Now you have:
- 8 clusters total
- Square shape forming
Fasten off if changing color.
🔹 ROUND 3 (Border Color)
Join yarn in any corner space.
- Chain 3.
- 2 dc in same corner.
- Chain 2.
- 3 dc in same corner.
- In side space (between corners):
Make 3 dc. - In next corner:
(3 dc, ch 2, 3 dc) - Repeat around:
- 3 dc in each side space
- (3 dc, ch 2, 3 dc) in each corner
- Slip stitch to join.
- Fasten off.
- Weave in ends.
Make 6 identical squares.
Tip: Block them lightly so they are flat and even.
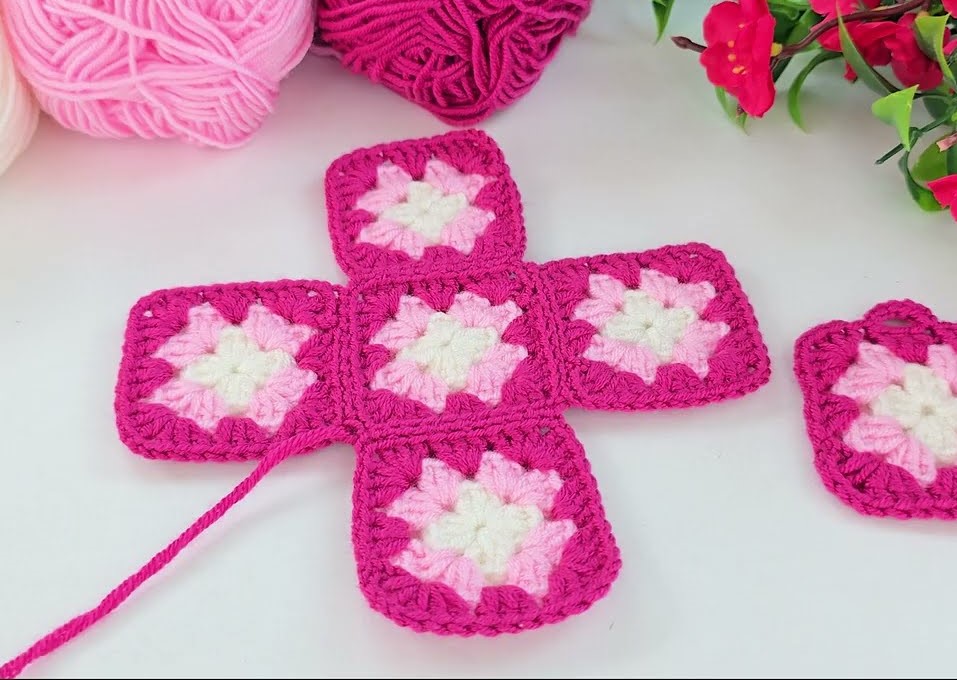
🧵 PART 2: ARRANGE THE SQUARES
Lay 5 squares like this:
Top
Left Center Right
Bottom
This is a cross shape.
The 6th square will be the flap.
🪡 PART 3: JOIN THE BODY
You can:
- Slip stitch through both loops
- Single crochet join
- Sew with yarn needle (neatest)
I recommend sewing for a cleaner look.
Step 1: Attach the 4 sides to the center
Sew:
- Top square to center
- Bottom square to center
- Left square to center
- Right square to center
Only sew the touching edges.
Now you have a cross shape connected.
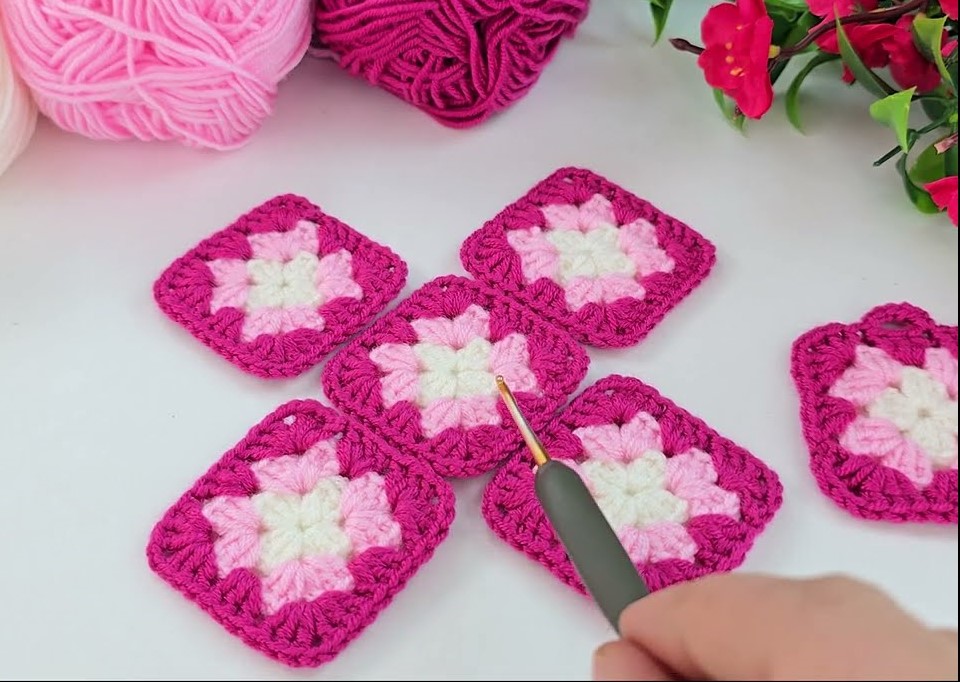
Step 2: Form the pouch
Fold:
- Left and right squares upward.
- Fold bottom square upward.
- Top square stays open (this becomes flap area).
Now sew:
- Left side to bottom side
- Right side to bottom side
You are sewing vertical edges to form walls.
Do NOT sew the top edge.
Now it looks like an open box.
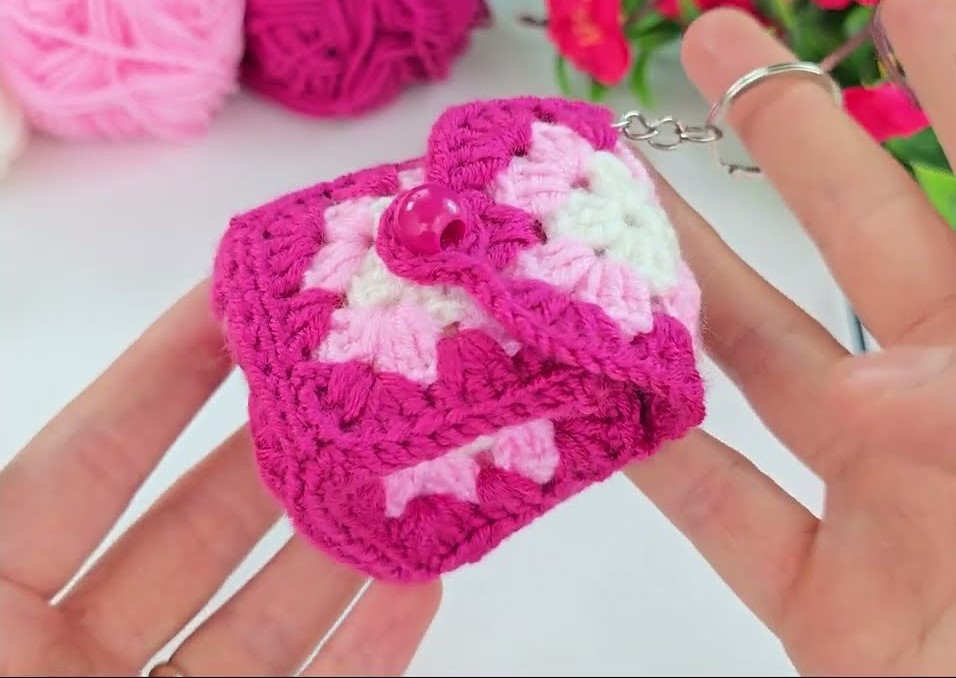
🧶 PART 4: ADD THE FLAP
Take the 6th square.
Sew one edge of it to the top back edge of the pouch.
Only sew ONE side of the square.
Now it flips forward as a flap.
🪡 PART 5: MAKE BORDER + BUTTON LOOP
Attach yarn at one corner of flap.
Single crochet evenly around flap.
When you reach middle of flap edge:
- Chain 6–8 (depending on button size).
- Skip 1 stitch.
- Slip stitch into next stitch.
- Continue single crochet around.
Fasten off and weave ends.
Test loop size before finishing.
🔘 PART 6: SEW BUTTON
Close flap.
Mark where loop touches front.
Sew button securely at that spot.
Make sure:
- Loop stretches slightly over button.
- Not too tight.
- Not too loose.
🔑 OPTIONAL KEYCHAIN LOOP
Option 1:
Attach yarn to top corner.
Chain 12–15.
Slip stitch back to same stitch.
Fasten off.
Option 2:
Insert metal ring directly into stitches.
💡 TIPS FOR A STRONGER POUCH
If you want less holes:
- Use smaller hook.
- Pull stitches tighter.
- Add fabric lining inside.
- Or make Round 3 using half double crochet instead of dc.
⭐ BEGINNER TIPS
- Keep corner ch-2 spaces loose.
- Count clusters each round.
- Make all squares same size before joining.
- Block squares if uneven.