
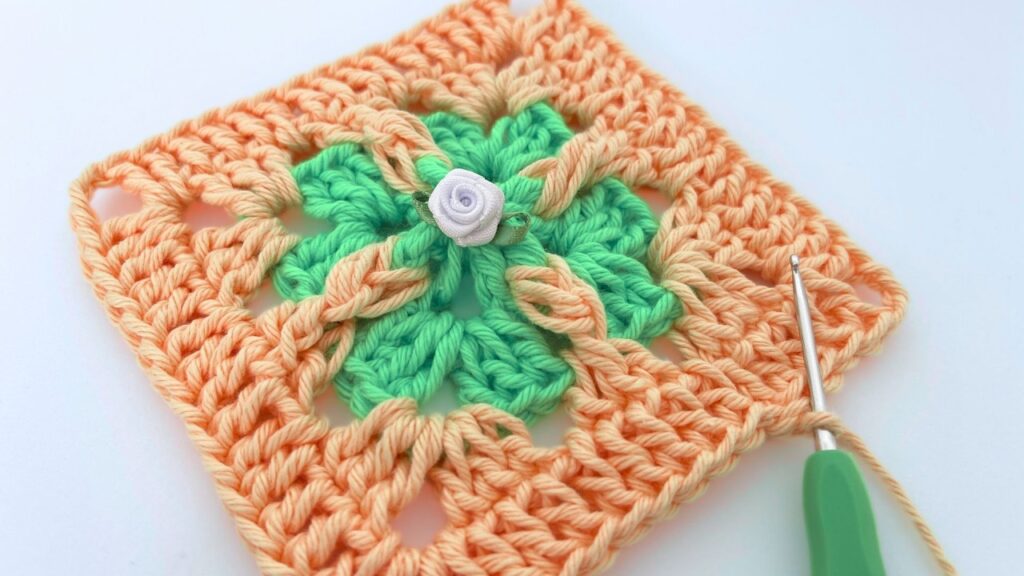
this is step-by-step, including exact stitch placement and tips so your square looks exactly like the photo.
This square has:
- 🌸 Round puff flower center
- 🌿 Long 3D layered petals
- 🔁 Twisted peach loops
- 🟧 Solid granny square border
🧶 Materials
- Medium weight yarn (2 colors)
- 4.0–5.0 mm hook
- Needle
- Scissors
Abbreviations (US terms):
- ch = chain
- sl st = slip stitch
- sc = single crochet
- dc = double crochet
- puff = yarn over, pull up loop (repeat 4 times), yarn over pull through all loops
🌸 PART 1 – FLOWER CENTER (GREEN)
Round 1 – Base Circle
- Make a magic ring.
- Ch 2 (counts as first dc).
- Work 11 dc into the ring.
- Pull ring tight.
- Sl st into top of beginning ch-2.
✅ You now have 12 dc stitches in a circle.
Tip: Keep stitches slightly loose so next round fits nicely.
Round 2 – Puff Petals (Small Layer)
- Ch 1.
- In same stitch make a puff stitch:
- YO, pull up loop
- Repeat 4 times
- YO, pull through all loops
- Ch 1 to close
- Skip 1 stitch.
- Puff in next stitch.
- Repeat around.
You should make 6 puff petals total.
Join with sl st to first puff.
👉 If your petals curl, they are too tight.

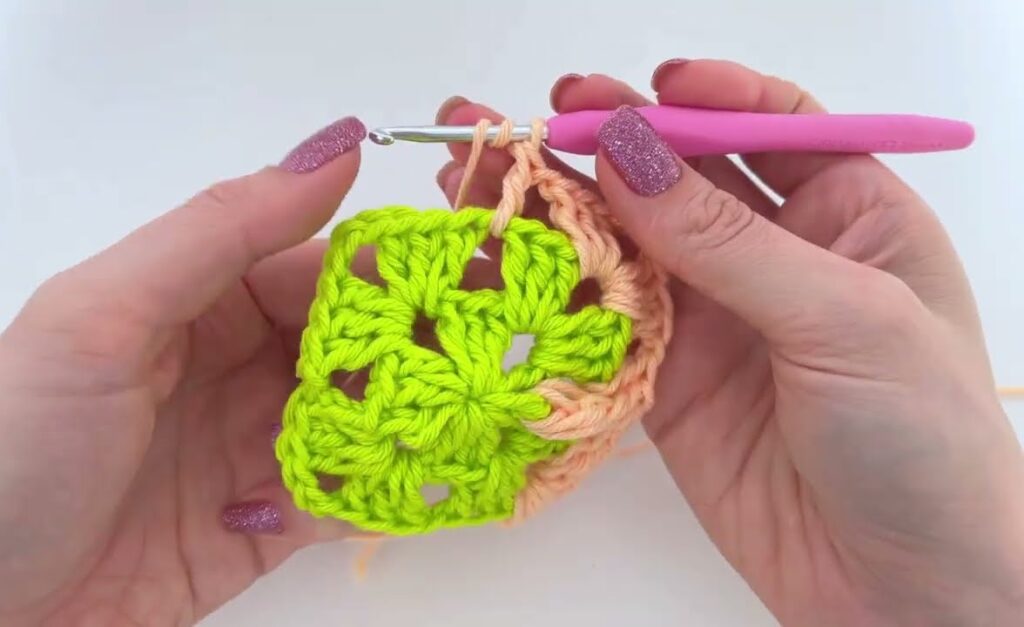
Round 3 – Large 3D Petals (Work Behind)
Now we work behind the puff stitches.
Turn flower slightly forward and locate the unused stitches from Round 1.
- Insert hook behind puff, into base stitch.
- Join yarn.
- Ch 3 (counts as dc).
- Make 4 more dc in same stitch (total 5 dc).
- Ch 1.
- Skip to next available base stitch (behind next puff).
- 5 dc in that stitch.
- Ch 1.
Repeat around.
You should now have:
🌿 6 large fan petals (each with 5 dc)
Join and fasten off green.
This creates the full green flower.
🌿 PART 2 – PEACH TWISTED OVERLAY
Attach peach yarn between two large petals.
Make Long Loops
- Ch 10 (this makes long loop).
- Sl st in next gap between petals.
- Ch 10 again.
- Sl st in next gap.
Repeat around.
You will have 6 long chain loops.
Create Twist Effect
To make the twist like photo:
For each chain loop:
- Twist loop gently clockwise.
- Bring loop slightly inward.
- Sl st into base space to secure twist.
Do not pull tight — keep it loose and soft.
This creates that rope-style decorative overlay.
🟧 PART 3 – FORM THE SQUARE
Now we build the granny square around it.
Join peach yarn in any gap.
Round 1 – Creating Corners
- Ch 3 (counts as dc).
- 2 dc in same space.
- Ch 2 (corner made).
- In next gap: 3 dc.
- In next gap: 3 dc.
- In next gap: (3 dc, ch 2, 3 dc) → this forms second corner.
Repeat pattern so you end with:
🔲 4 corners total
🔲 4 sides
Join with sl st.
Round 2 – Strengthen Square
In each corner:
- 3 dc
- ch 2
- 3 dc
In each side space:
- 3 dc
Continue around.
Join.
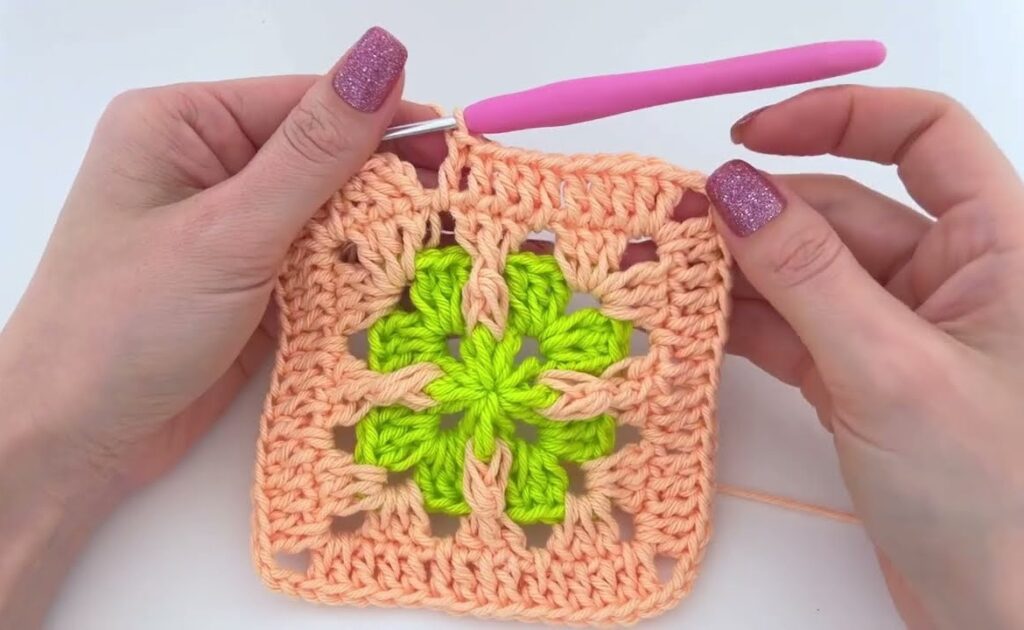
Round 3 – Final Round
Repeat same structure:
- 3 dc in each side space
- (3 dc, ch 2, 3 dc) in each corner
This makes the square larger and neat.
Fasten off.
✨ Finishing
- Weave in all ends.
- Lightly steam block.
- Sew small decorative rose in center (optional).
📏 Important Shape Tips
✔ If square curls → too tight
✔ If square waves → too loose
✔ Keep all chain loops same length
✔ Keep puff stitches same height