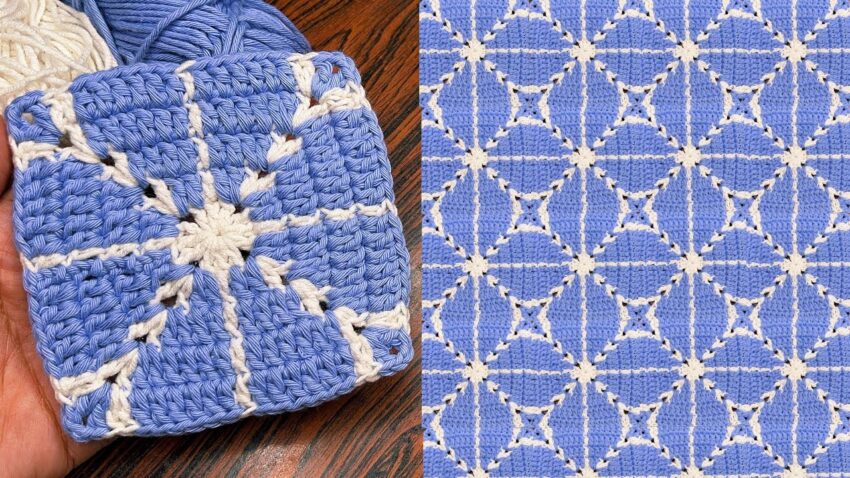
Here is a step-by-step tutorial to make the crochet square and the beautiful joined pattern shown in your image.
This design is a 2-color overlay grid square, built from a simple blue base square + white surface crochet to create the star/grid shapes.
🌼 FULL DETAILED TUTORIAL
This pattern has two parts:
- Crocheting the blue base square
- Adding the white overlay lines (surface crochet) to create the star + grid design

⭐ PART 1 — BLUE BASE SQUARE
This is a dense, modern solid square (not a granny square with holes).
If you follow these rounds exactly, your square will match the picture.
🔹 Round 1 – Center
- With blue yarn, ch 4, sl st into circle.
- Inside ring:
ch 3 (counts dc), 11 dc → 12 dc total - Join to top of ch 3.
✔ This center creates the small hole where the white overlay will radiate from.
🔹 Round 2 – Increase
- Ch 3, 1 dc into same stitch (2 dc cluster)
- 2 dc in each stitch around
→ 24 dc total - Join.
✔ Your circle is now expanding and smoothing out.

🔹 Round 3 – Forming Corners
This round converts the circle into a square.
Repeat this sequence 4 times:
- Corner:
(2 dc, ch 2, 2 dc) in same stitch - Next 5 stitches:
1 dc in each
Join.
▶ Stitch pattern around the square:
Corner → 5 dc → Corner → 5 dc → Corner → 5 dc → Corner → 5 dc
🔹 Round 4 – Growing the Square
Work in corners and across the sides:
- In each corner space: (2 dc, ch 2, 2 dc)
- Along each side: 1 dc in each stitch
- Side stitch count increases to 9 dc per side
Join.
🔹 Round 5 – Final Size (optional)
Same pattern:
- Corners: (2 dc, ch 2, 2 dc)
- Sides: increase to 13 dc per side
Join & fasten off.
✔ Now your square should match the photo in size and density.

⭐ PART 2 — WHITE OVERLAY STITCHING
This is the magic that creates the “woven lattice” pattern.
We use a technique called surface slip stitching.
How it works:
Insert your hook into the front of the fabric, catch the white yarn underneath, and pull up a loop. Then slip stitch along the surface, following a straight path.
🌟 STEP 1 — CENTER STAR (WHITE)
Attach white yarn into the center hole created in Round 1.
You will create 8 spokes:
- Insert hook into center
- Pull up white yarn
- Insert into the next nearest post or stitch going outward
- Slip stitch
- Continue slip stitching in a straight line until you reach the next round
Repeat for all 8 directions:
- Up
- Down
- Left
- Right
- 4 diagonals (between corners)
Your center will now form the same starburst shape as in the photo.

🌟 STEP 2 — THE STRAIGHT GRID LINES
Now we create the white “+” symbol that runs vertically and horizontally.
Horizontal line
- Start at the middle stitch of one side
(this is the stitch exactly halfway between two corners) - Slip stitch across the top surface, following the tops of the stitches
- Stop exactly at the middle stitch on the opposite side
Vertical line
- Repeat the same process from top to bottom
✔ This forms the cross that runs across the entire square.
🌟 STEP 3 — DIAGONAL TRIANGLE LINES
These make the shape complete.
For each corner:
- Attach white yarn at the corner space
- Slip stitch diagonally toward the center
- Follow the edges of the dc posts so the line is clean and straight
- Stop when you reach the horizontal or vertical line
Repeat for all 4 corners.
Your square now matches the left picture.
⭐ PART 3 — JOINING TO FORM THE REPEATED PATTERN
To create the beautiful tessellated effect (right picture):
Use white yarn to join the squares edge to edge:
Method: Slip stitch through back loops only
- Align two squares
- Insert hook into the back loops of both squares
- Slip stitch all the way across
- The white stitching matches the overlay lines so the motif looks continuous
This is how the pattern flows into a large blanket or cushion cover.