
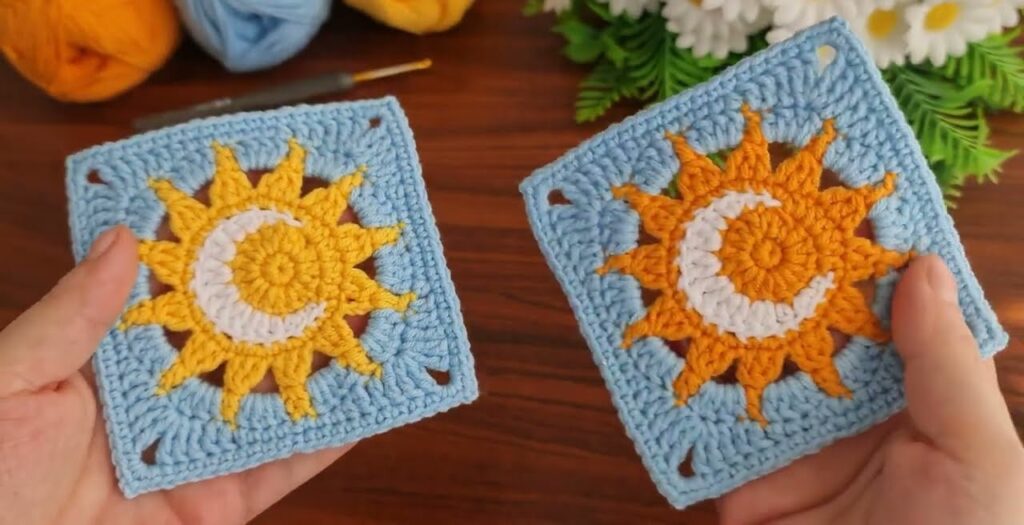
That’s a beautiful crochet Sun and Moon Granny Square! 🌞🌙
Here’s a step-by-step guide to make it yourself:
🧶 Materials
- Yarn: 3 colors of 100% cotton or acrylic DK (Size 3) yarn
- Yellow (Sun)
- White (Moon)
- Light Blue (Background)
- Hook: 3.0–3.5 mm
- Scissors & yarn needle

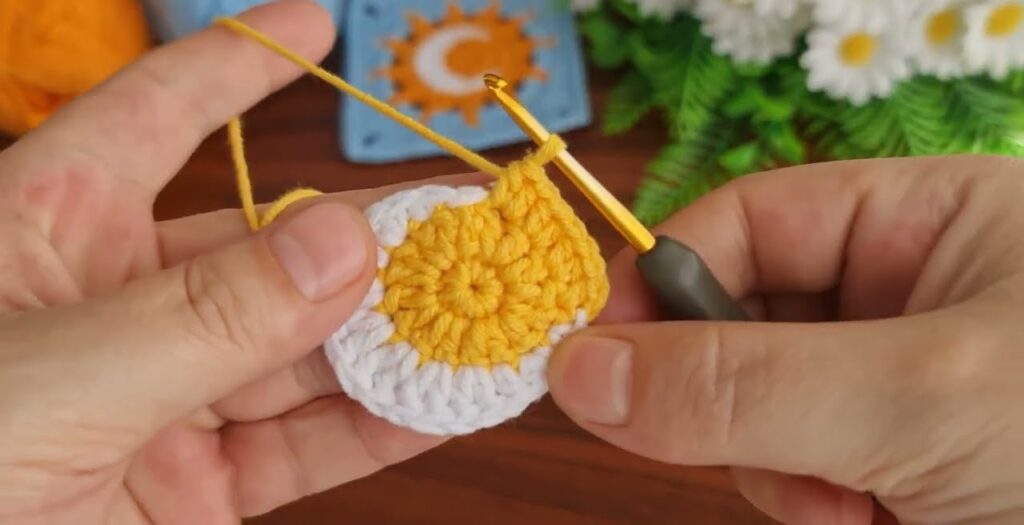
☀️ PART 1 – Sun Center
With yellow yarn:
- Magic ring (or ch 4 and sl st to form a ring).
- Round 1:
- Ch 2 (counts as dc).
- 11 dc into the ring.
- Join with sl st to top of starting ch-2.
👉 (12 dc total)
- Round 2:
- Ch 2.
- 1 dc in same stitch.
- 2 dc in each st around.
- Join with sl st.
👉 (24 dc total)
- Round 3 (optional for larger sun):
- Ch 2. 1 dc in next st, 2 dc in next st repeat around.
👉 (36 dc total)
- Ch 2. 1 dc in next st, 2 dc in next st repeat around.
🌞 PART 2 – Sun Rays
Still with yellow yarn:
- Ch 1.
- (sc in next st, hdc in next st, dc in next st, tr in next st, ch 2, sl st in same tr st, tr in next st, dc in next st, hdc in next st, sc in next st)
→ That forms 1 sun ray. - Repeat this pattern all around (each ray uses 9 stitches).
- Fasten off and weave ends.
🪄 Tip:
If you want sharper rays, replace “ch 2” with “ch 3” before sl st back.
🌙 PART 3 – Crescent Moon
Attach white yarn between two rays (anywhere you like).
- Row 1:
- Ch 1, then into next stitches of the yellow circle (not the rays):
1 sc, 1 hdc, 2 dc, 2 tr, 1 dc, 1 hdc, 1 sc. - Turn.
- Ch 1, then into next stitches of the yellow circle (not the rays):
- Row 2:
- Ch 1, work back: 1 sc, 1 hdc, 1 dc, 1 tr, 1 dc, 1 hdc, 1 sc.
- Fasten off.
This forms a gentle crescent.
You can make the curve thinner by skipping the outer dc/tr stitches, or thicker by adding 1 extra tr in the center.

🩵 PART 4 – Background (Blue Square)
Attach blue yarn to the tip of any sun ray.
- Round 1:
- Ch 3 (counts as dc).
- Dc in next spaces between rays, but at every third space (four times total), make a corner:
(2 dc, ch 2, 2 dc). - Continue around.
- Join with sl st to top of ch-3.
- Round 2:
- Ch 3.
- 1 dc in each dc, working (2 dc, ch 2, 2 dc) in each corner space.
- Join with sl st.
- Round 3 (optional, for larger square):
- Repeat the same pattern — dc around, corners as before.
✨ PART 5 – Finishing
- Cut yarn and weave all ends on the back.
- Lightly block the square (pin it flat and steam or dampen) so edges stay even.
🧵 Stitches Used
| Abbreviation | Stitch Name | Description |
|---|---|---|
| ch | chain | — |
| sl st | slip stitch | — |
| sc | single crochet | — |
| hdc | half double crochet | yarn over once, pull through 3 loops |
| dc | double crochet | yarn over once, pull through 2 × 2 |
| tr | treble crochet | yarn over twice, pull through 3 × 2 |